What the POS Is
The POS is a till screen. It strips a sales invoice down to what a counter actually needs — item, quantity, rate — and does everything else silently:
- GST comes from the item master, so nobody at the counter thinks about tax rates.
- Stock reduces from the shop or warehouse you're selling from.
- A real Sales invoice is created — the same voucher a typed invoice produces, visible in the Day Book, countable in GSTR-1.
- Cash is the default customer, so a walk-in sale needs no name at all.
Nothing here is a lightweight or separate "POS mode" ledger. It's your books.
Before You Start
- Items must exist with their rate and GST rate set. The desktop till only accepts known items — it won't invent one mid-sale, which is deliberate: a counter is the wrong place to create masters.
- Barcodes on items, if you'll scan on the phone.
- Warehouses set up, if you sell from more than one shop.
💻 Part 1 — The Desktop Till
Open Transactions → 🛒 Point of Sale (POS).
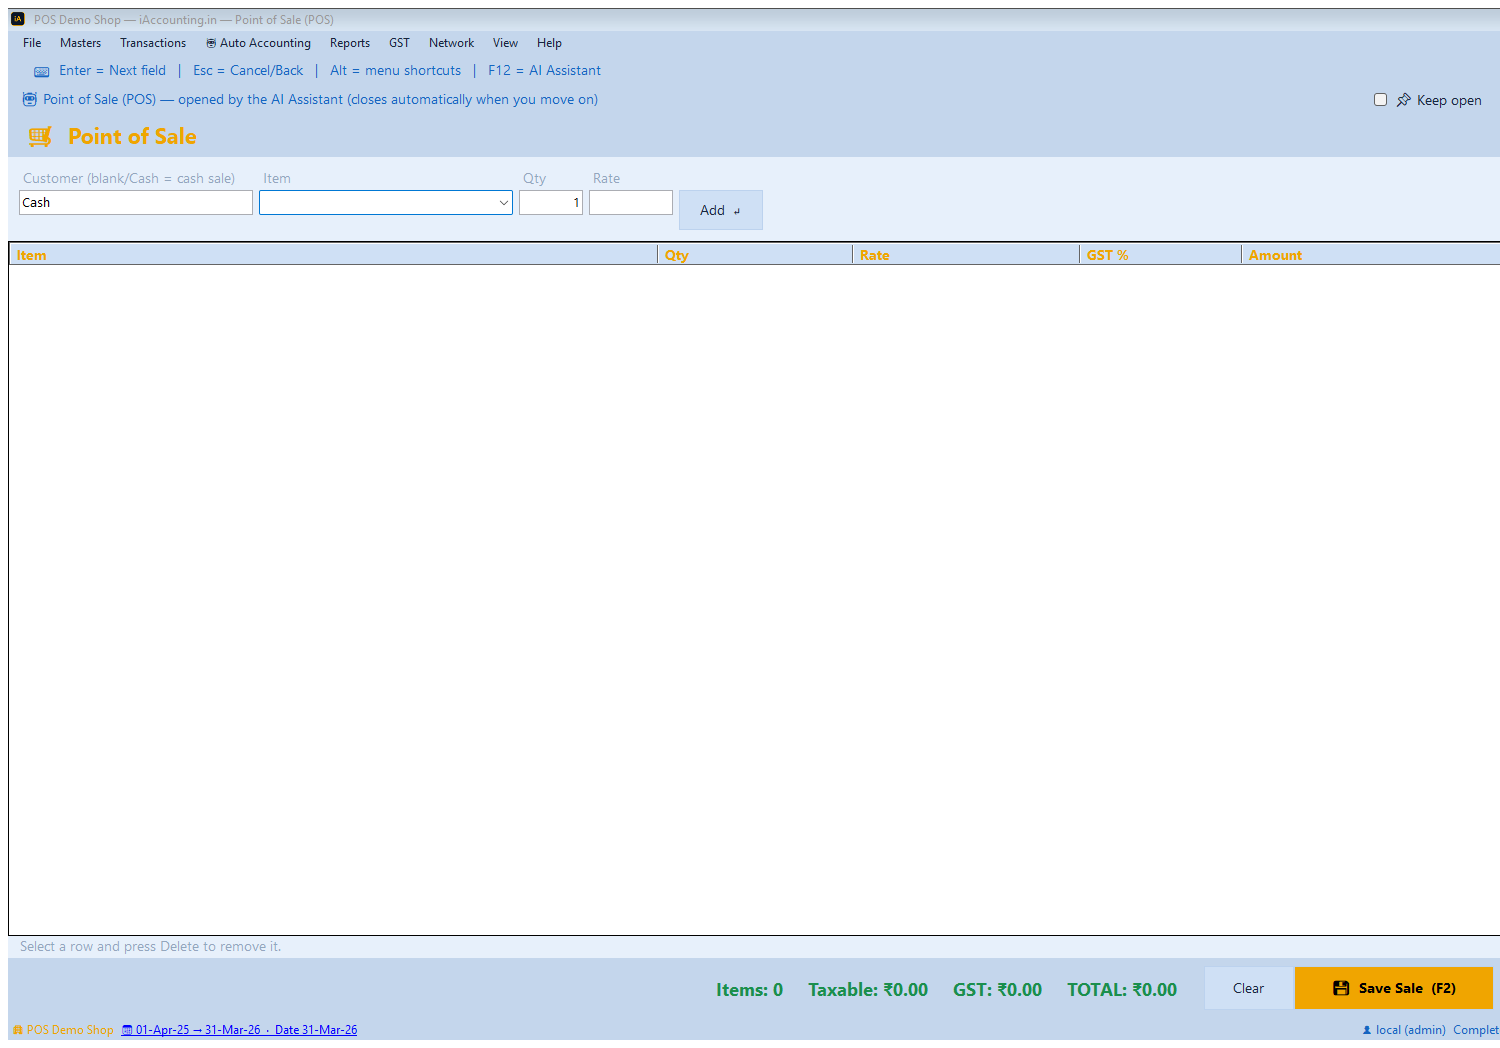
The screen is one entry row across the top — Customer · Item · Qty · Rate · Add — a cart grid in the middle, and totals with Save Sale along the bottom. That's the whole thing.
The Keyboard Flow (This Is the Point)
The till is built to be worked without touching the mouse. The Enter key walks you through a line:
- Start typing the item name — it auto-completes from your item list.
- Press Enter → jumps to Qty, with the value selected so you just type over it.
- Press Enter → jumps to Rate (pre-filled from the item master).
- Press Enter → the line is added to the cart and you're back at the item box for the next one.
So a three-item sale is: type, Enter, qty, Enter, Enter — three times. No mouse, no tabbing around.
Made a mistake? Click the row in the cart and press Delete to remove it. Clear empties the whole cart and asks first.
Cash Sale or On Account
The Customer box starts as Cash. Leave it and the sale is a cash sale.
Type a customer's name instead and the sale is billed to that debtor — created automatically if they're new — so it shows in their account as outstanding. That's the only difference between a walk-in and a credit sale here.
Saving the Sale
Press F2 from anywhere on the screen (or click 💾 Save Sale). F2 works from any field, so you never navigate to the button.
You get a confirmation with the invoice number and the breakup — taxable, GST, total. The cart clears, the customer resets to Cash, and focus returns to the item box, ready for the next customer.
The Entry It Creates
| Ledger | Amount | |
|---|---|---|
| Dr | Cash (or the customer) | Grand total |
| Cr | Sales | Taxable value |
| Cr | Output CGST / SGST / IGST | The tax |
Plus stock out for every line. It's the same accounting path a full Sales invoice takes — the POS is a faster front door to it, not a different system. There's a negative-stock guard per warehouse, so a sale that would take stock below zero is caught rather than silently posted.
A Worked Example
Two items at the counter: 3 × ₹200 at 18%, and 1 × ₹500 at 5%.
| Line | Working | Amount |
|---|---|---|
| Item A | 3 × ₹200 | ₹600 |
| Item B | 1 × ₹500 | ₹500 |
| Taxable | 600 + 500 | ₹1,100 |
| GST | 18% of 600 + 5% of 500 | ₹133 |
| Total | 1,100 + 133 | ₹1,233 |
Note the GST is worked out per line from each item's own rate — a mixed-rate basket is handled without anyone at the till thinking about it.
📱 Part 2 — The Android Mobile POS
The mobile POS is a fuller till than the desktop one in some ways, because a phone can do things a desk cannot: scan barcodes with its camera, and print to a portable thermal printer.
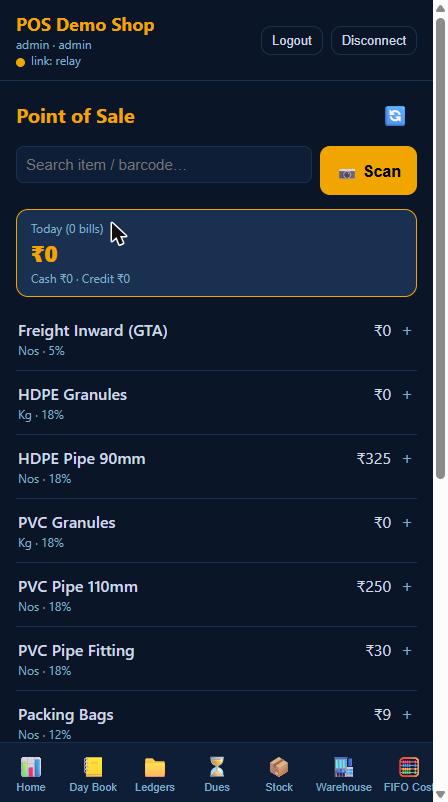
Open the app and go to the POS screen. You get a search bar with a 📷 Scan button, today's collection at the top, the item results, and the cart below.
Building the cart
- Search by item name or barcode, and tap a result to add it.
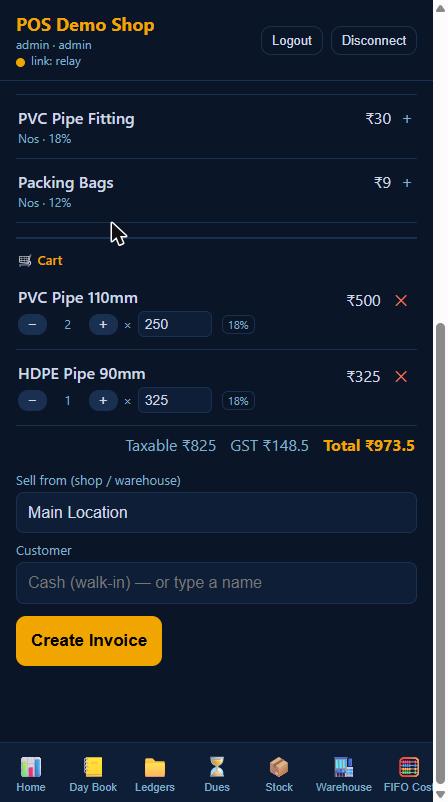
- Each cart line has − and + buttons for quantity, an editable rate box, the GST% shown as a tag, and an ✕ to remove the line.
- Tapping the same item again just increases its quantity rather than adding a duplicate line.
- A live totals strip shows Taxable · GST · Total and updates as you tap.
Barcode Scanning
Tap 📷 Scan and point the camera at the barcode. The matching item drops into the cart and you carry on — no typing, no searching.
This is what makes the phone a genuine till for a shop with barcoded stock: one hand holds the phone, the other passes goods across the counter.
Selling From a Particular Shop
The mobile POS has a "Sell from (shop / warehouse)" picker. Stock is reduced from whichever location you choose, which is what makes multi-shop billing work: each salesperson sells from their own location, and stock stays right per shop rather than draining from a single pool.
Set it once at the start of a shift.
Printing the Receipt
After each sale a sheet appears with the invoice number and total, and four ways to get it to the customer:
| Option | What it does |
|---|---|
| 🧾 Print receipt here | Prints from the phone itself — thermal or normal. For a portable printer at the counter or on a delivery round. |
| 📤 Share / Save PDF | Opens the phone's share sheet — WhatsApp the bill to the customer, or save it. |
| 🖨 Print thermal receipt at the shop | Sends it to a printer connected to the desktop. Useful when you're billing on the floor and the printer is at the counter. |
| 📄 Print full invoice at the shop | The full A4 tax invoice rather than a receipt, printed at the desktop. |
If the desktop has several printers you're asked which one; with just one it goes straight there.
WhatsApp-ing the PDF is worth making a habit — the customer gets a proper bill, you use no paper, and it costs nothing.
Today's Collection
The mobile POS shows a running total at the top: today's bill count, the total, and the cash-versus-credit split for that salesperson's terminal. It updates after every sale.
At the desk, Reports → POS Collection (by Terminal) gives the same picture across all terminals — which is how you reconcile the cash drawer at closing without counting bills by hand.
The Salesperson Lockdown
A user with the salesperson role sees a stripped-down application: a File menu (change password, log off, exit), a POS menu with New Sale, and the theme toggle. That's all.
No ledgers, no reports, no vouchers, no masters, no ability to see your margins or edit anything. Give counter staff this role and they can bill all day without reaching anything else in your books.
Two more guards worth knowing: the negative-stock check per warehouse, and a minimum-selling-rate floor — where you've set price levels, a salesperson cannot bill below the minimum rate you've set for that customer's level.
Desktop vs Mobile
| 💻 Desktop till | 📱 Android POS | |
|---|---|---|
| Best for | A fixed counter with a keyboard | Barcoded shops, shop-floor and delivery billing |
| Speed | Fastest — all-keyboard, Enter-to-Enter | Fast with barcodes; slower to type |
| Barcode scan | Via a USB scanner into the item box | Built in, uses the camera |
| Warehouse choice | Company default | Picked per shift on screen |
| Receipt | Print at the desktop | Print on the phone, WhatsApp a PDF, or print at the shop |
| Today's collection | Reports → POS Collection | On screen, live |
| New customer | Type the name — created | Type the name — created |
| Needs the desktop running | It is the desktop | Yes — the phone is a remote control |
| Result | Identical — a real Sales invoice with stock out and GST recorded | |
Plenty of shops run both: the desktop as the main counter, phones for the floor and for the queue at busy times.
Troubleshooting
| Message / problem | Cause / fix |
|---|---|
| "…is not a known item. Pick one from the list." | Add the product to your item master first. The till won't create items. |
| "Enter a quantity greater than zero." | Qty is blank or zero. |
| "Enter a valid rate." | Rate is blank or not a number. |
| "The cart is empty — add at least one item." | You pressed F2 with nothing in the cart. |
| Sale refused — negative stock | The sale would take stock below zero in that warehouse. Correct the stock, or check you picked the right shop. |
| Rate won't go below a figure | The minimum-selling-rate floor for that customer's price level. Ask an admin to change it. |
| "Your licence expired…" | Data is safe; new sales are blocked until you activate. |
| Phone can't reach the till | Desktop not running, remote access off, or not paired. Check the PIN pairing. |
| Barcode won't scan | The item may have no barcode saved. Search by name and add the barcode to the item master afterwards. |
Tips & Best Practice
- Set rates and GST on every item first. The till's speed comes from not thinking at the counter — that only works if the masters are complete.
- Teach the Enter rhythm. Ten minutes with a new counter person on type-Enter-qty-Enter-Enter pays for itself in a day.
- Use the salesperson role for counter staff. It's the simplest way to keep your books private without a separate machine.
- Pick the warehouse at the start of each shift on mobile, and confirm it after switching shops.
- WhatsApp the PDF rather than printing where the customer is happy with it.
- Reconcile the drawer with POS Collection at closing — count cash against the cash figure, not against the total.
- Add barcodes to fast-moving items. The scan-to-cart flow is where mobile beats the keyboard.
- Don't let the till create your masters. Add new products properly, with rate, GST and barcode, before they hit the shelf.
What's Next?
- Sales Invoice + e-Invoice + e-Way Bill — for B2B billing that needs an IRN
- Purchase Invoice → Stock & ITC — keeping the shelves stocked
- File GSTR-1 — your POS sales in the return